This post is all about starting a self-hosted blog that you can monetize from Day One!
First of all – Congratulations! If you’re reading this, I can only assume you are taking your first steps on your blogging journey. How exciting!
I remember when I first wanted to start a blog. The idea for my first blog kind of just hit me out of the blue, but then I just sat with it for TWO WHOLE YEARS. I felt like I had such a great idea, but I was completely paralyzed. There is so much information online about how to go about it.
From hosting, plug-ins, social media – I was overwhelmed
Chances are, you probably are too.
So take a deep breath and lets break it all down, step-by-step. You can do this!
(NOTE: Some of the links in this guide are affiliate, meaning I will receive some compensation from the company when you purchase, but you WILL NOT be charged more money. It’s just the company saying ‘Thank You’ for recommending their outstanding services and I don’t ever recommend anything I don’t stand behind 100%)
Decide On Your Why
Why do you want to start blogging?
Is it for passion, community, money? Honestly, my blog has been one of my most rewarding, uplifting, frustrating experiences of my life.
Starting a blog can be an incredible Side Hustle. It can even become a full-time income
For me, (beyond the money and financial freedom) blogging is creative outlet, a way to meet interesting, like-minded individuals, and it’s also become a self improvement journey. My writing skills have greatly improved in the last year. Also, I’ve learned a lot of skills I didn’t have before, like graphic design.
Thanks to my blog, I am able to work from anywhere in the world. I’m constantly learning new skills in a field I love. My blog has truly changed my life! And I know it can change yours too
Also, no matter what you’re interested in, whether it’s business, movies, DIY, organization, knitting, parenting, music, anything – I assure you, there is someone out there that would enjoy reading your posts and thoughts.
My one recommendation if your main goal when it comes to blogging is money (and I know all the gurus out there will scream at me for this), the riches are NOT in the niches – Blogging gurus tell you to get very specific about a topic, and that makes sense if you’re an expert in a certain field, or incredibly passionate about one topic. But the internet is a very big place! Why are you going fishing with such a narrow net? The wider the net, the greater chances of generating traffic.
Some people come to my blog for the money posts and don’t care for the travel, and vice-versa. I think that’s great! I am always generating traffic because there’s a little something for everyone here.
Clarification: You should have a niche, but don’t micro-niche yourself. For example, my niche is ‘Woman in their 20’s’ which can encompass a wide range of topics. It isn’t ‘Single 26 year old moms with 2 kids and a part-time job at Macy’s.” Pick a Niche, but keep it wide and go fishing! Later on you’ll see what articles and topics your readers truly love and can make adjustments as necessary.
Choose A Domain Name
This step is where a lot of people freeze up. My recommendation is to write down a couple of words (around 15-30) of what your blog will be about. Just jot it down. It can be related to your topic, or how you want your blog to feel, use your own name if you want.
Once you have your list, I recommend checking that all the socials are available of that name. I use this site to check if they’re available.
Although you probably won’t use all forms of social media (I actually recommend on focusing on just one when you’re starting out), it’s good to reserve the names and have them available. Check that your name isn’t taken on facebook, instagram, twitter, and pinterest – even if you don’t think you’ll use it. I reserved all my names, even though I mostly only ever use Pinterest.
Quick note on the name : although a name is important, don’t sweat it so much. What’s much more important is the content you’ll post on the site.
I would keep the name short and easy to remember. Also, check to make sure you aren’t picking a name that’s trademarked by someone (check here http://www.uspto.gov/trademarks). Although you might love HaleysSweetDesserts.com, it’s very likely readers will forget or might even misspell the domain and land on an incorrect page.
While SweetHaley.com is much more easily remembered and alludes to the meaning of the blog without pigeonholing you. Try to keep the name under 12 characters!
Don’t overcomplicate it! I know some bloggers spend months (yes, months!!) deciding on a name. Chances are, you’re paralyzed because you’re a perfectionist of some sort and don’t want to make a mistake. You will make a lot of mistakes blogging, but just choosing a name and moving on won’t be one of them.
I have seen plenty of phenomenal blogs with some pretty meh names. Nobody cares about your blog name as much as you.
Just make sure YOU like it. That’s the most important thing.
I actually regret the name of my first blog (TheFab20s.com) because I used numbers (rookie mistake) but that hasn’t stopped, deterred, or affected my growth in any way. Don’t stress it!
You should be sure to pick a domain name that is…
Easy to remember – Don’t choose a long name, a word that’s tough to spell, or something filled with dashes. No one will remember a site named like http://www.the-super-mom-does-it.com, but something like http://www.supermom.com is very memorable.
Unique and Descriptive – You want it to be a reflection of who you are and what you’ll blog about. Just make sure you don’t pigeon hole yourself. A site like ilovecooking.com might limit you to just the cooking niche and as your site grows, its very possible your interests do too.
Trustworthy – Stick to a .com, .net, or .org. Don’t go for anything odd like .biz, they are tougher to remember and much less trustworthy
Put your desired domain name in the box and if it’s available you can register it! If not, try another one. Mix and match synonyms until you find the perfect one.
Choose A Reliable Hosting Platform
You’re going to need to decide on a reliable hosting platform. And yes, I 100% recommend a self-hosted site. If you don’t self-host, it means your site would look like this http://www.thefab20s.blogger.com.
Technically, anything you write on a free site like that isn’t yours. It’s owned by blogger.com (or whatever site you use). Also, if you ever decide to monetize your site, it will be really hard (if not impossible) and brands tend to not want to work with sites like these.
A self-hosted site is simply more professional, even if it’s just a hobby
Also, when you self-host, ensure you use WordPress.org. The free option, WordPress.com does not allow monetization via advertising or sponsorships of any type.
Now, there are plenty of hosting sites available.
For this tutorial, I will walk you through setting up your BlueHost site.
I’m a fan of both Bluehost and Hostgator, but BlueHost is very, very beginner friendly and offers a free domain name when you sign up (score!)
For the sake of this tutorial, I’ll walk you through setting up your account with Bluehost.
Why I recommend BlueHost :
Bluehost probably has the best reputation among bloggers who are just starting out. They truly go above and beyond ensure setting up your site is easy and hasslefree. Plus they offer a plethora of other benefits
-FREE Domain
-FREE Site Builders
-1-Click WordPress Install (amazing!)
-24/7 Support (priceless)
-Plans start at only $4.00 a month! (The basic plan is all you need to get started)
Click here to go to Bluehost.com and click ‘Get Started.’
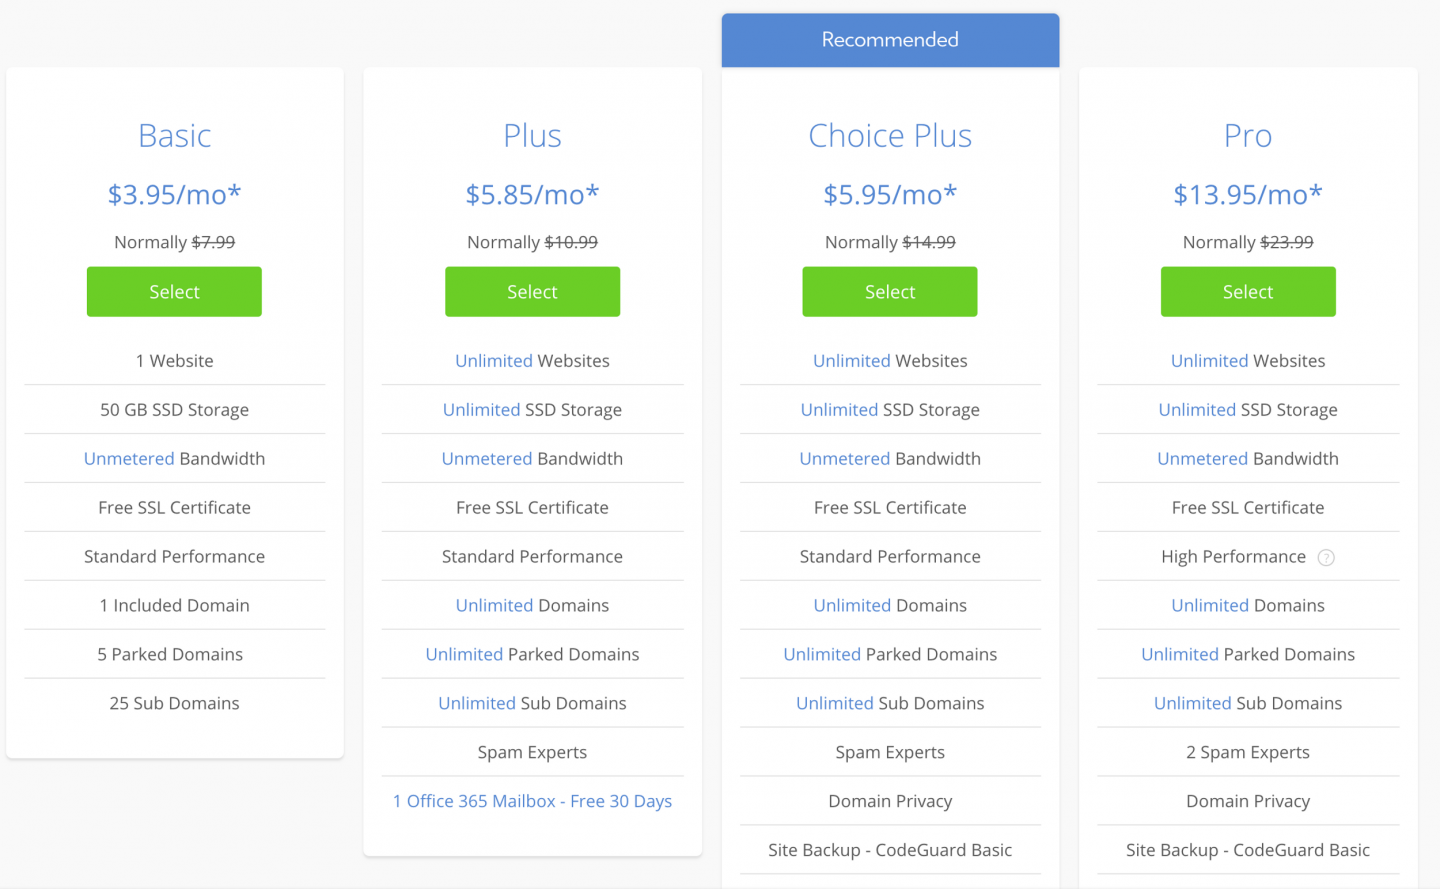
Select your hosting plan.
Here you pick your plan. When I first started, I picked the Basic plan but quickly realized I needed Domain Privacy. When you add Domain Privacy later, it ends up being about the same as the Plus.
Domain Privacy basically means no one can look up your name, address, and phone number on Whois.
I highly recommend you splurge on the domain privacy. Anyone can find out where you live if you don’t. (Yes, anyone!!)
Choose Your Domain Name

Complete Your Registration
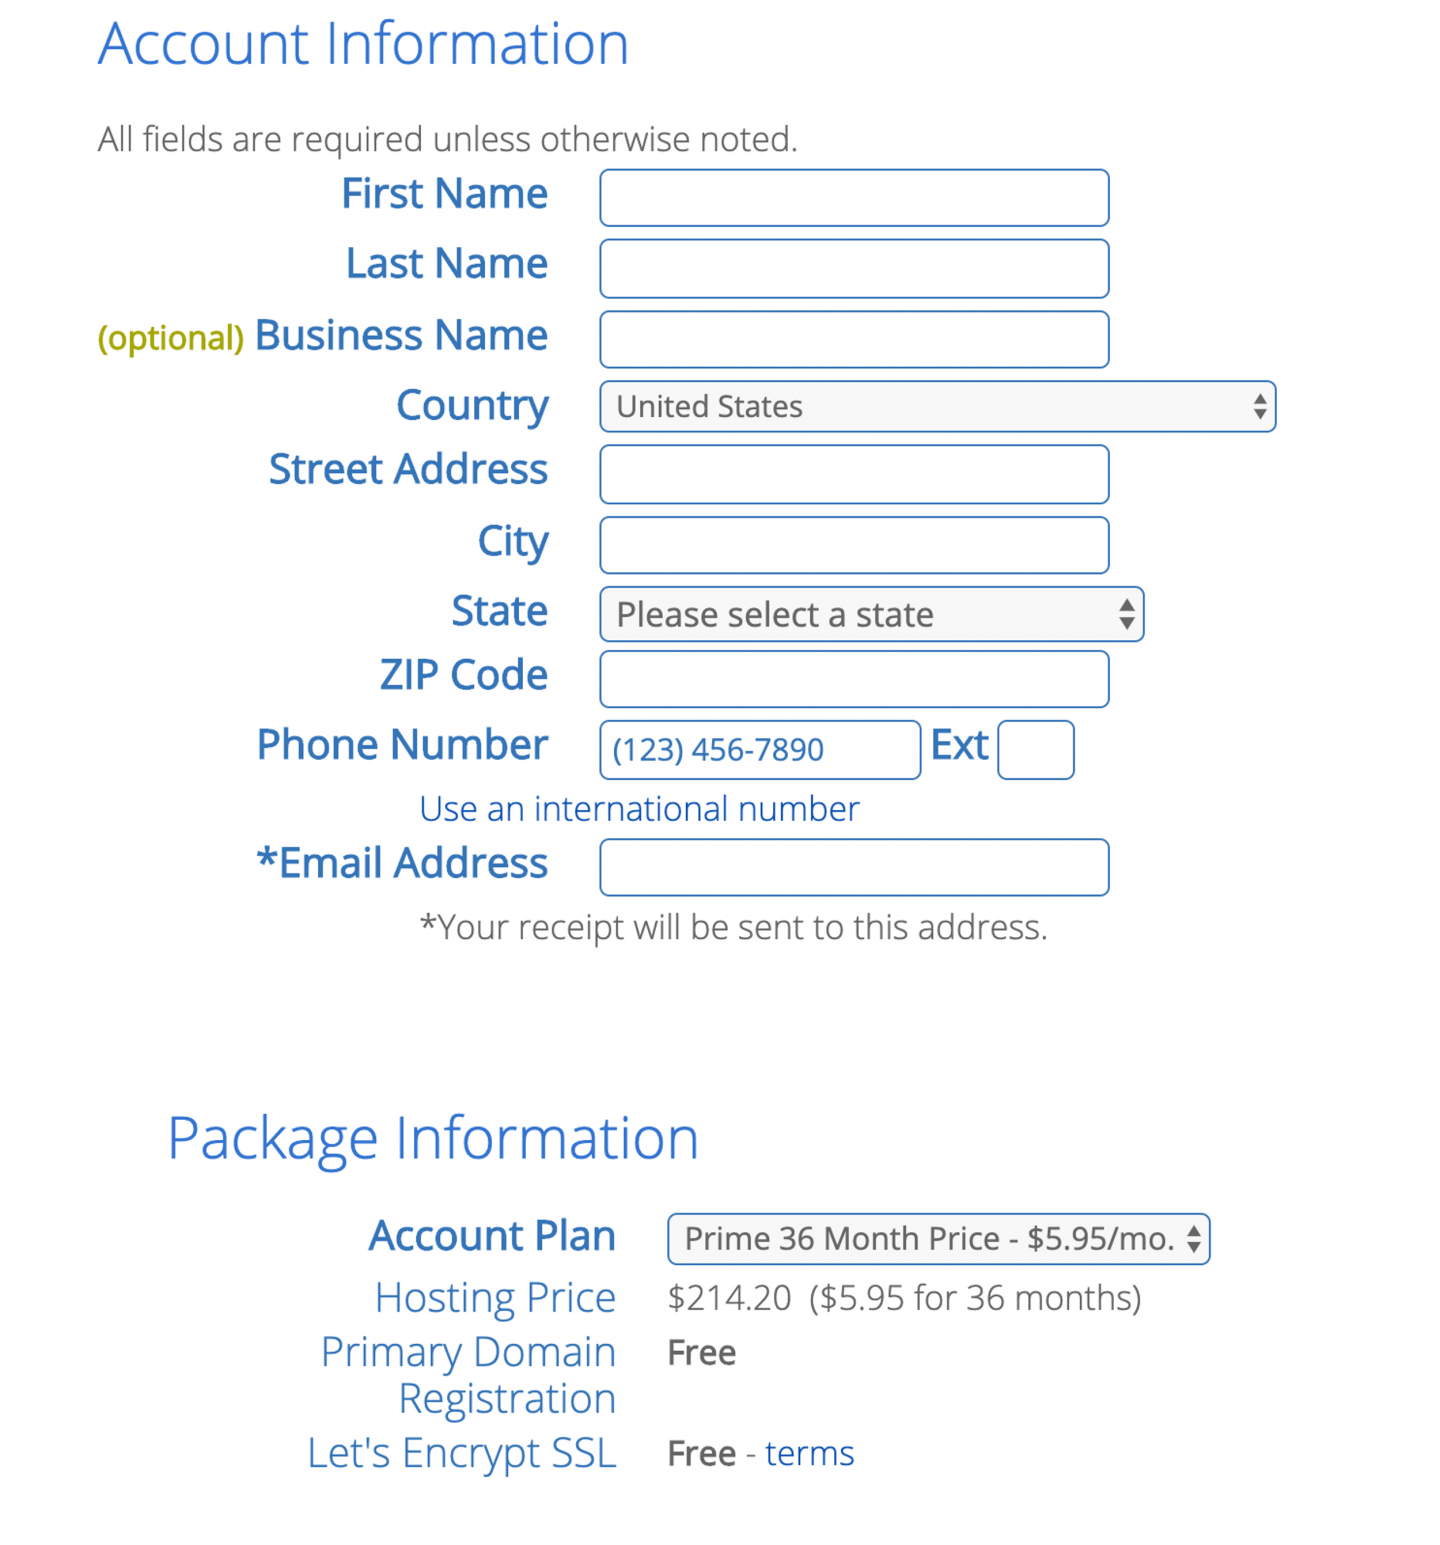
Depending on what package you select, this will look slightly different for you.
If you’re serious about blogging, I’d recommend locking in your rate for 3 years, but that’s completely up to you.
Also, the Package Extras, the only one that you should add at this point is the Domain Privacy!! Sorry to be a broken record you guys, but you need to be safe on the internet!
Below that you will put your payment information. You will pay for your hosting all at once, as opposed to month-to-month. Click to agree to the terms and then click ‘Next.’
Once you’re done with that, you should be taken to the ‘Sign Up Successful’ page where you can create a password
This will be your login to access all your websites information and hosting, make sure it’s one you will remember!
But also, make sure it’s difficult enough that someone can’t guess it. Even with a small blog, hackers will try to get in.
Log In And Set Up WordPress
Once you have set your password, you can log in to Bluehost.
Okay, now that you have a domain and a hosting plan, we can start creating your blog.
Once you’re logged into your account, look to the top left side where it says “Hosting”, click to open the hosting tab and then click ‘Home’ or ‘Cpanel’ (either works)

Once you’re on the ‘Home’ or ‘Cpanel’ page, scroll down to ‘Website’ and look for ‘Install WordPress’
Click the Icon and you will then be prompted to install WordPress. Click Install, give your new WordPress site a name and attach it to your domain.
Fill out the information to set a username and password for the new admin to WordPress. The new admin is you and you can put any name here you like. This login information is what you will use to log in to your site to create post and content – so again, make sure its something you can remember but isn’t easy for hackers to figure out!
While WordPress is installing, you will see a green bar at the top of your screen showing its progress. You may be prompted to choose a theme from Mojo Marketplace, it’s not necessary but you can definitely check it out.
Once WordPress is finished, you will be able to log in to you site. The log in page will look like this:
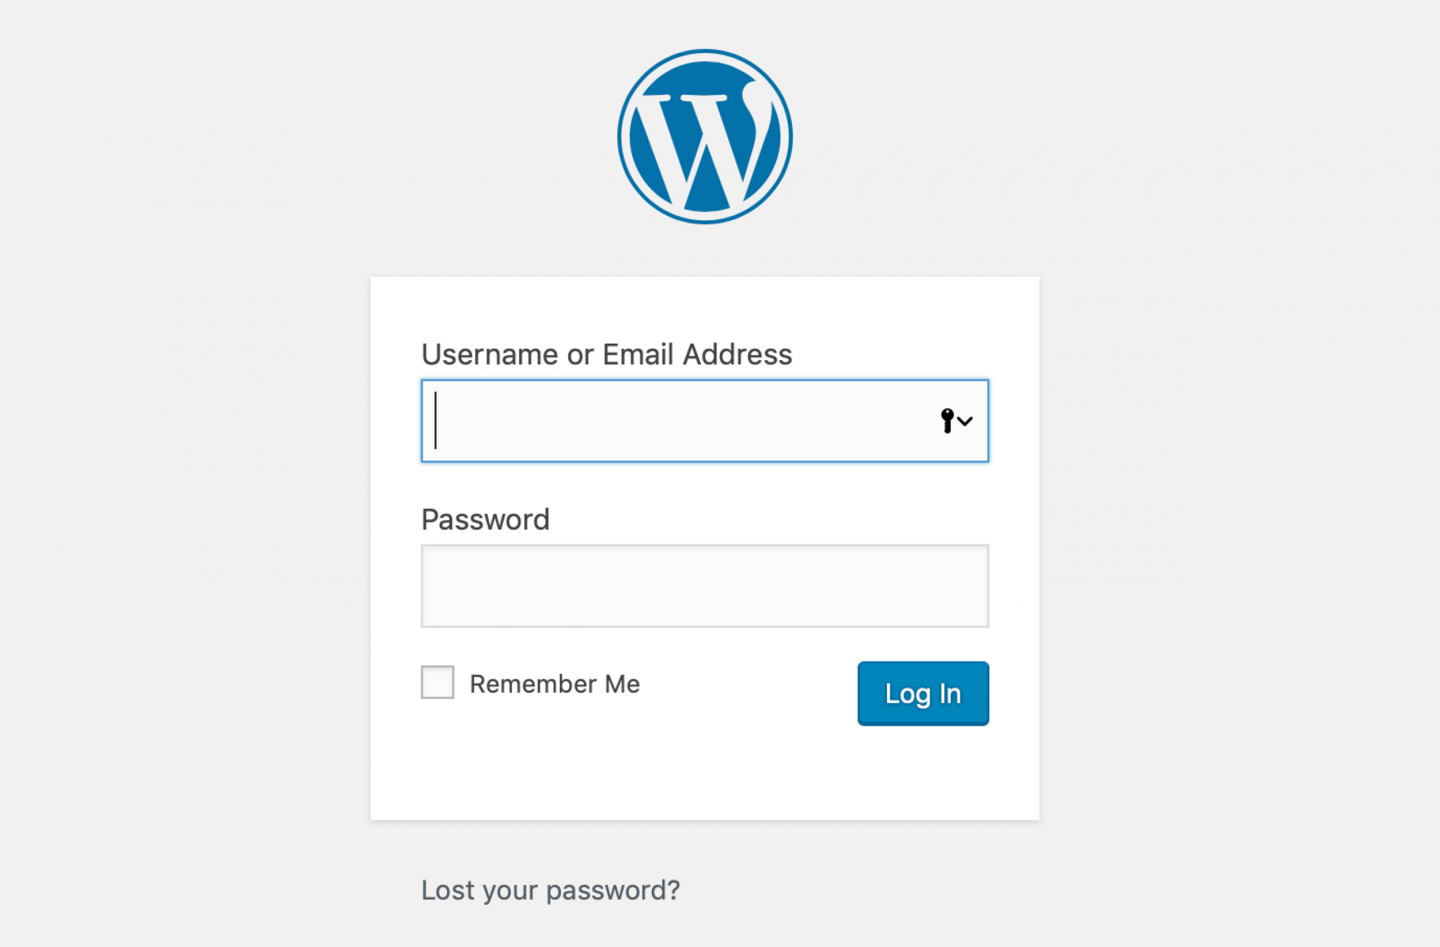
You can always access your login page by typing http://www.yourdomain.com/wp-admin into your address bar.
Once you’ve logged into WordPress, you will be on your WordPress Dashboard, which will look like so:

On the left hand side, you will see tabs to create posts and add pages. We will go through all of this in a bit…
All the following steps are very important if you wish to monetize your blog and make it Search Engine Friendly. Don’t skip these sections!
Install Secure HTTPS
- Bluehost provides free SSL certificates for all assigned and parked domain names set up in your account. Most of the time, the SSL will automatically assign and install itself to your new domain, but there are cases where we have to do it manually. To activate your free WordPress SSL CertificateLog into your Bluehost control panel (CPanel)
- Click the Addons tab.
- Locate SSL Certificates, and click on the learn more button.
- Click the get started button under WordPress Free SSL.
- Click the Install button.
Once you’ve turned the SSL on, it can take a few hours to install and activate. In certain situations, you may need to take action to complete the process. If that’s the case, you’ll receive an email with instructions to follow.
Once complete, you will have a working SSL certificate for your domain name!
We can now log back in to our WordPress Dashboard
You can access this dashboard by going to https://yourdomain.com/wp-admin and entering your password.
CONGRATULATIONS!! YOU ARE THE PROUD OWNER OF YOU VERY OWN SELF-HOSTED WEBSITE THAT CAN BE MONETIZED FROM DAY 1!
But before we can go ahead and start creating posts, there are a couple more things we need to do to ensure you website is set up correctly
Set Up Google Analytics
This step is pretty straight forward –
- Create a free Google Analytics account.
- Install this free plugin to easily install and monitor your Google analytics within WordPress.
- Follow the plugins prompts to authenticate your account. Easy-peasy.
Connect Google Search Console To Your Site
To easily connect your blog to Google Search Console, make sure you have the Yoast Plugin installed. Just download the free version, that’s all you’ll need for now.
1. Head on over to Google Search Console (formerly Google Webmaster Tools) and sign in with your Google account.
2. Once logged into Google Search Console, click the “Add a Property” button to add your website. ‘Property’ means website in googles world.
3. In the popup, add your website URL and click the blue button.
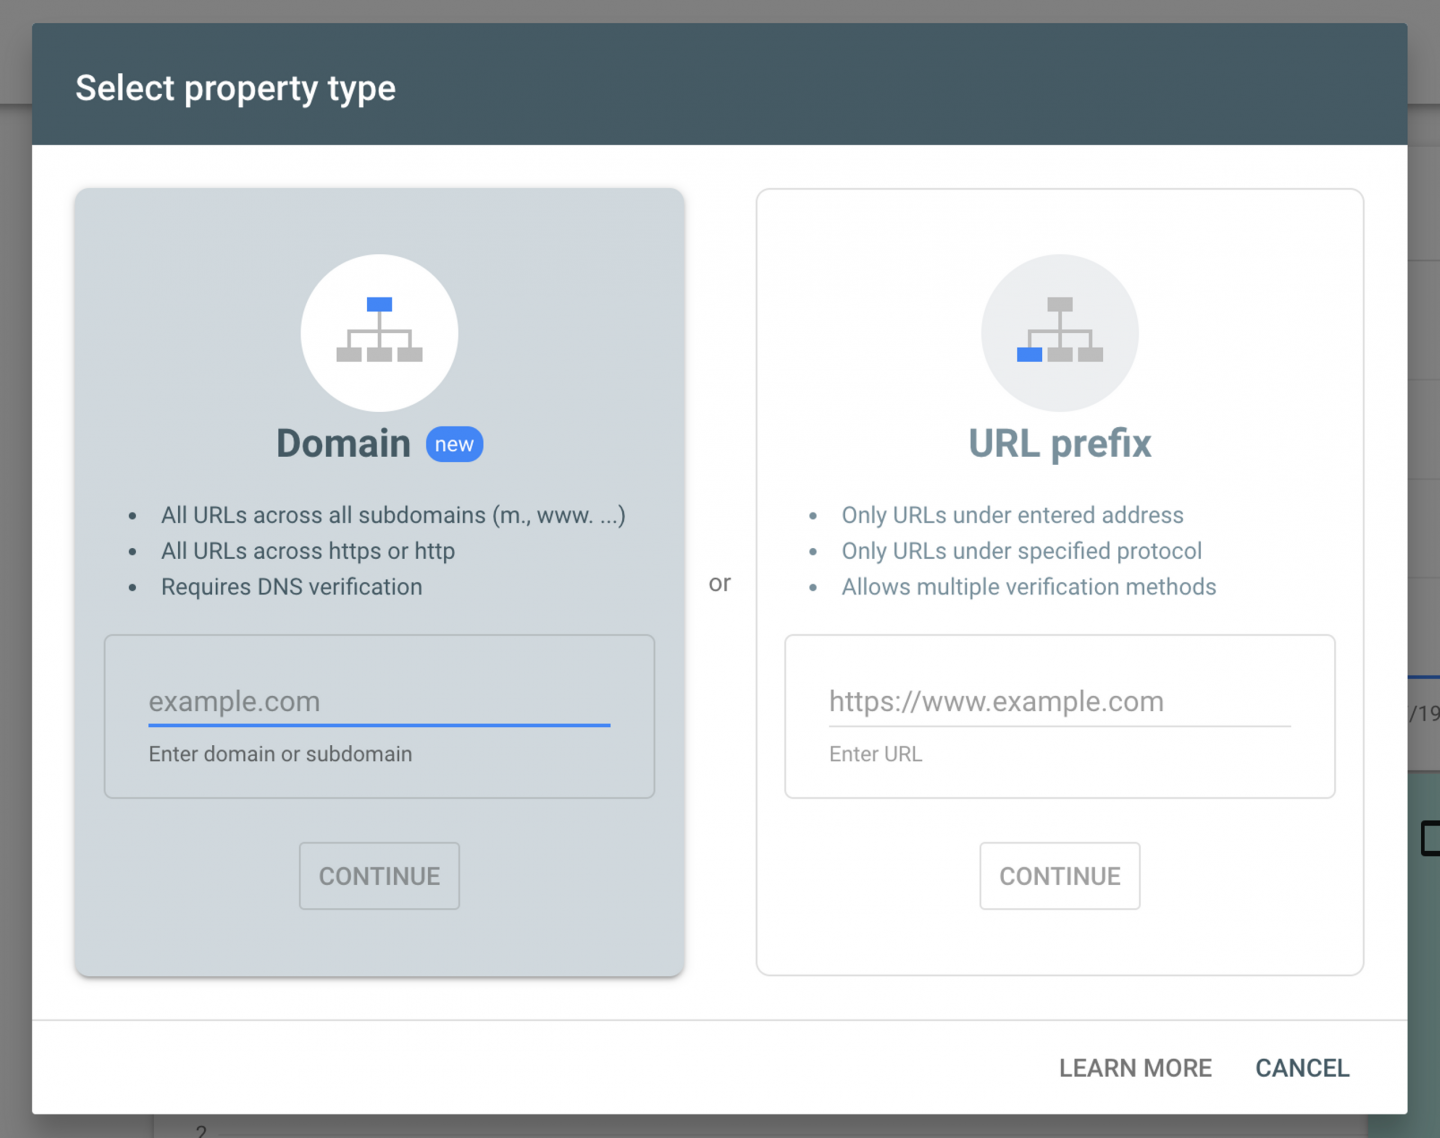
4. Click on the‘ Alternative Method’ tab. You will be given a code. Copy the code, and then paste it into your website <head> section, before the <body> section.
If you aren’t sure how to do that, this free plugin makes it super easy to put code into your <head> section: AddFunc Head & Footer Code Plugin.
Once you have done that, you can click ‘verify’ in Google Search console.
5. Now, head on over to your WordPress dashboard and on the left hand side, click ‘SEO’ and then ‘Search Console’ which is Yoast’s way of connecting your blog to your Google Search Console.
6. From here, click ‘Settings’ and then ‘Get Google Authorization Code’ this will then display a popup window, you will sign in to Google, and it will give you a code. Copy the code and paste it into the box, and click the blue button ‘Authenticate.’
Your website will now be connected to Google Search Console and Yoast.
Enable Sitemaps in Yoast
1. In your WordPress dashboard look on the left hand side, click ‘SEO and then ‘General.’
2. Click on the ‘Features’ tab, and make sure that XML Sitemaps is set to ‘on.’

3. View your XML Sitemap by clicking the ‘See the XML Sitemap’ link. You may have to click the question mark ( ? ) symbol to see the link.
Submit Your Sitemap To Google
- Sign in to Google Search Console.
- On your Search Console home page, select your website.
- In the left sidebar, click Crawl and then Sitemaps.
- Remove outdated or invalid sitemaps like
sitemap.xml - Click the Add/Test Sitemap button in the top right.
- Enter
sitemap_index.xmlinto the text box that appears. - Click Submit.
Whew! That wasn’t so bad! Congratulations on your new site! Now is when the real fun begins….